 Account
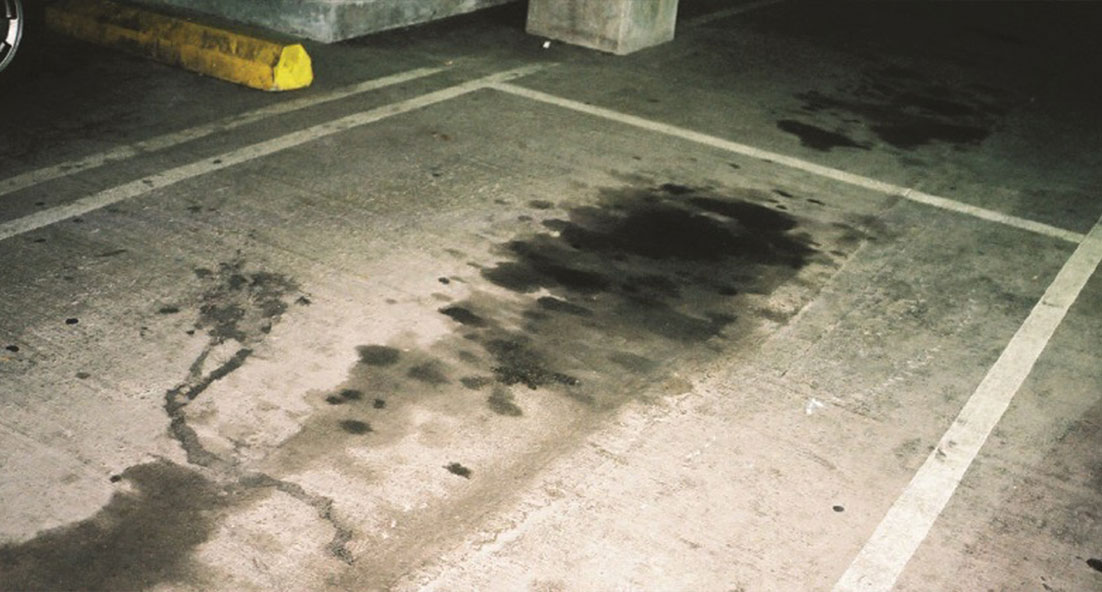
The most common reason for the failures and bad finishes of an epoxy coating is the lack of preparation. For long-lasting and beautiful floorings, it’s important to prepare the concrete surface properly.
If you are planning to paint a floor or wall then it will be well worth your while to take note of the 7 most common mistakes in order to achieve the best results:
1) Contamination
A lot of people refer to surface contamination and whilst of course, it is very relevant, the surface is only what you can see. What about the contamination of the substrate??!
Concrete is like a sponge. It is full of air holes. Should you tip a bucket of water onto unsealed concrete and probably 95% will disappear into the concrete! This is all very well when referring to water. The water will rise and evaporate over the next few days and the floor will become perfectly dry. However, spilling oil onto an unsealed floor and this is can never be fully eradicated. Should you clean the top surface and leave it for two weeks, the oil from within the substrate will simply rise and the surface becomes as black as it was in the first place.
As everyone knows, coating a floor with a twin pack resin coat is the best way of sealing the floor. However, this only makes the oil situation worse. Due to the fact that it is totally impervious, which of course is great for sealing the floor in the first place, this then acts like a plastic sheet placed over grass in the middle of summer. Having had no rain for a few months and with the ground very dry, the plastic sheet draws up moisture and within a very short space of time, it can be very wet under the sheet. A totally impervious floor will act the same way when applied to an oily floor. It only makes the oil rise faster!!
To solve this problem use Polycote OT primer. This is indeed a twin-pack epoxy, but one that has been specifically formulated to fully adhere to and seal, oily surfaces.
2) Dusty and Loose Surfaces
Many people will say that their floor is solid and ready to paint. Many will say that it is brand new power-floated concrete and think they have the very best surface to paint. Unfortunately, this is rarely correct..!
There would, of course, be some people that need a slip-resistant finish but mostly, a super smooth finish is required and either a hand steel trowel or power float is used to achieve this.
In order to get the smooth finish, all the ‘fines’ are worked to the surface and basically, the finer the material, the smoother the floor and of course, this is the dust that is coming off the surface. This fine layer can actually be very weak. If you think that your floor is dust free, simply brush the surface hard with a stiff broom back and forth on the same piece 5 or 6 times, run the palm of your hand over the surface and now look at your hand. In over 99% of cases, your palm will be covered in a very fine layer of dust. Should you not remove this weak laitance, THIS is what your paint is going to stick to. When the coating fails – and everybody blames the paint – well, simply peel the paint off the surface, turn it over and look at the back. It will be very clear the paint has adhered wonderfully to your concrete – you will see 100% adhesion on the back of the sample. Unfortunately, the fact is that it will be your concrete that has delaminated and NOT the paint.
This problem can be easily solved by using the correct method of preparation. To learn more about which method is best for you contact the Polycote team.
3) Rising Damp
This common mistake usually happens from not allowing the concrete to dry sufficiently, the pouring of the concrete. There are numerous ways or theories as to how long you should leave freshly laid concrete before painting. The reason for this is that ALL are dependent upon at least three factors; a) thickness of concrete, b) temperature and c) humidity levels. Architecturally, you will hear “One month per inch thickness” or from perhaps the younger members of the trade – 1 day per mm thickness”.
What we can say, is that many companies do not have this length of time to wait and it is well known that should the general temperature levels and/or humidity level allow a ‘reasonable’ period of cure that one can paint a surface perfectly successfully after a period of 1 month. The writer would however wish to make it very clear that although he has had almost 30 years of the tools experience, we in no way wish to be held responsible for any subsequent failure of a coating by this statement and that any coating of a floor is entirely the responsibility of the reader!!
The second common mistake in relation to dampness is the application of paint after a liquid chemical preparation has been carried out. These chemicals are normally water-based and sufficient time must be allowed for the concrete to dry prior to the application of the said paint. Again, this period of time is entirely dependent upon both the atmospheric temperature and humidity, PLUS consideration needs to be given to the porosity of the concrete and the amount of water allowed to soak in. Of course, this can have a huge influence on the amount of time the substrate will take to dry as the will of course whether or not an Aquavac be used to dry up/remove as much of the liquid as possible.
Again, as a rule of thumb, you need to allow for a minimum of 24 hours when using a reputable Aqua-vac. Alternatively, when simply allowing for evaporation, it is advised to allow at least 3-7 days.
Last but not least another very simple ‘mistake’ is the failure to perform a very simple moisture test using a Moisture Meter. Moisture under the slab can create hydrostatic pressure that will actually cause the epoxy to separate from the surface, sometimes taking pieces of concrete with it. You can avoid this problem by doing a simple moisture test first to determine if your floor is suitable or not for an epoxy coating.
When all is said and done, some water-based epoxies and primers allow for application to concrete that may still be damp. However, please be sure to contact the manufacturer for further information if you are unsure.
If moisture IS trapped in the pores of the slab, they will mostly rise to the surface and end up creating unsightly bubbles in the finish.
4) Removal of Existing Coatings or Screeds
A lot of people simply wish to re-coat their floors. This is mostly due to the existing coating flaking, bubbling, and lifting, but may be due to the existing coating being worn and tired.
One big mistake of many is to simply wish to overcoat what they have now and everything will be bright and ready. No sooner have they completed the task, they then walk/drive onto the floor and find the first use simply lift the paint off the floor!
Their next point of ‘attack’ is to contact the manufacturer and complain bitterly that this must be a bad batch. We simply ask the customer to peel a piece off the floor, turn it over and let us know what is on the back! Basically, this will highlight one of the three most common issues;
- it will peel off as clean as a whistle – thereby showing that the surface has more than likely been previously sealed with some sort of surface hardener or silicone sealer, resulting in the fact that the subsequent coating has zero penetration into the substrate
- it will be covered in the existing surface, whether it be the old paint or the concrete floor surface itself. This shows that the ‘new’ paint has adhered to the existing coating but that the existing coating has delaminated from the surface, or the fact that the back is covered in anything from large lumps of concrete to fine surface dust – showing the surface of the concrete is breaking up and/or dusting.
- Oil, waxes and chemicals (should they have been previously present in the substrate) can often be seen on the back of the sample piece and/or can mostly be seen clearly on the concrete surface itself. Should it be rising damp, again, the darkness of the floor from which the paint has just been removed will be darker than the surrounding previously exposed concrete. This is simply because the air has been allowed to get to the previously exposed areas and has allowed the dampness to rise and evaporate.
5) Temperature and Humidity
Please make sure that you maintain the correct temperature for the chosen product. Be sure to check the datasheet or ring our technical line for confirmation.
- Cold Areas / Surfaces
Products applied at a temperature too low may never cure or at the very least will take far longer. The fact that it does hold back the curing of the product will mean that you will never achieve the correct hardness and this will inevitably reduce the longevity of the coating. - Hot Areas / Surfaces
At the opposite end of the spectrum, take great care when applying in hot temperatures as this will greatly reduce the pot life. Should you be in awkward areas or in hot conditions, then it may well be advised to split the unit down but whatever you do, PLEASE make sure you split them correctly. It is also strongly advised to stir the tubs thoroughly (individually) first BEFORE decanting into smaller units.
Important Things To Remember:
The surface temperature of the substrate is really what is the most important. To heat up a cold area can take a lot longer than thought due to the heat rising and the room appearing ‘hot’ whilst the coldness in the floor takes a lot longer to ‘thaw’ out. When applying next door to a freezer or fridge, or even next to an outside wall of a building when the weather outside is freezing, remember that the coldness can transfer through the substrate and affect the curing of the product in these areas. Equally, we have known many a person to think a good warm day at 25°C is ideal to paint a surface, completely forgetting that the surface temperature in direct sunlight can be far, far higher. This then means the coating gets too hot too quickly and can either mean the applicant has an extremely difficult job of applying it quickly enough…!
High humidity levels can cause a thin film of moisture to settle on the surface of the concrete that you more than likely cannot even see. This can result in the coating bubbling due to trapped moisture, an orange peel effect and even the ultimate problem being delamination. Should this humidity settle on the uncured resin, immediately after application, this can also cause the colour to blush. Should this happen, it may well not actually cause any great detriment to the coating other than the aesthetic appearance and this blushing can often be ‘washed off’ with warm soapy water. However, whatever you do, please make absolutely sure the coating has had time to fully cure before washing. Alternatively, if you can live with the appearance, this blush can often disappear through natural wear and tear.
6) Curing Times
As we have touched on in the ‘5th Most common Problem’ above, it is important that the operative / client realises that curing times can differ enormously, both by way of the pot life once the two parts of resin have been mixed together and also the final cure time.
-
- Pot life / Application
If the temperatures are cold, then it is advisable to store the resin in a warmer area prior to using. This will help to keep the resin more fluid and ensure correct coverages are met. Alternatively, if the resins are allowed to get cold, they will naturally thicken and become harder to lay. - Final Curing
- Pot life / Application
If temperatures are hot, with low humidity levels, then the coating is going to cure very fast. In fact, I have known Flortex SG to be touch dry in only 1 hour (normal curing time 12 – 18 hours) when applying in a hot boiler house that had possibly not seen water on the floor for the past 40 years!!!
Equally, we have of course seen the reverse whereby the floor coating will never harden due to the temperature effectively killing the curing process! It is important to note the minimum application temperatures of any product (both by way of storage AND during application. If the temperatures do drop below the stated figures, the very least you can expect are greatly lengthened curing times. At worst, the product will never be as hard as it should have been and finally, of course, is the dreaded ‘non-cure’ situation that requires scraping up the resin and starting the process again…!
7) Not Reading the Instructions
We’ve been established in this industry for a quarter of a century and frankly, we can often spot when we are going to hit a problem, (the ‘Bad Batch Blamers’) long before the said customer has even received the paint. We have unfortunately proved over and over again, the following disaster-in-waiting signals. The people are going to be coming back sooner rather than later.
- The ‘I Know What I’m Doing’ people
- The ‘Yes, Yes, I Done This For Years’ people
- The people who do not have ‘time’ to listen.
Alternatively, we have next set of people who do listen but then:
- Can’t see the point of what they have been told and so continue in their own sweet way
- Listen keenly and with genuine interest but then don’t pass on the vital information to the operative that is actually carrying out the work…!
In an attempt to ‘push the last point (No. 7) home’, we have even decided to give you a couple of absolutely true classic disaster examples:
Disaster 1:
A customer’s premises had stood empty for the previous 10 years and the cold and damp had got into the whole fabric of the building. We advised him to warm up his premises for at least a week before he wished to paint. We pointed out that heat rises and the substrate, which takes in the cold from the frozen ground beneath, would remain cold and take much longer to warm up. He decided to whack in a big heater and then paint the floor. He didn’t do as advised and very simply…….the floor coating didn’t cure!
Disaster 2:
We advised another client to make sure he kept the heating on all night. However, in his wisdom, he decided to turn it off and save what might have amounted to £2 – £3 in fuel costs. Unfortunately, the temperature dropped to well below freezing and ‘killed’ the curing process. Not wishing to scrape up the resin and start again, he waited a week, hoping it would cure. (To be fair, in most cases a coating will cure and it is simply the case of getting the heat back on and being patient!) However, with time running out (he needed to move in to the premises), he decided to go against the removal of the coating and to apply the top coat over the uncured primer. To be fair, he did at least leave the heating on this time and of course, with good dry conditions, the top coating cured fine. However, he had his next problem…which we did of course warn him of!
If you apply a coating over the top of an uncured primer, the top coat will in fact still cure. However, it is almost guaranteed that the said top coat will then crack/bubble (due to not going on to a hard ‘solid’ surface) and the uncured resin from beneath will inevitably ooze a sticky mess through the top coat – which of course, is exactly what happened!
The net result was a whole lot of time wasted and an incredible amount of stress caused – all for the sake of not listening to simple and basic advice – coupled with the futile attempt at saving a few quid by turning off the heating…!
Summary
We would like to assure you that this guide has NOT been given to unduly worry you or to cause you to pay huge sums of money to so-called professional contractors. In fact, quite the reverse! The achieving of a successful floor coating is actually easy and this guide is intended for your ENCOURAGEMENT!
Many of these epoxy application errors can be easily avoided by reading (thoroughly) the manufacturer’s instructions and paying close attention to this guide.
And finally…
- These 7 most common problems can be easily avoided if you take the time to research your project, prepare your surface correctly, and make yourself familiar with the manufacturer’s instructions. If you are ever in any doubt or have any question, then please PLEASE contact the manufacturer for clarification before you start.
- To ring a manufacturer and blame a ‘bad batch’ is unfortunately extremely common when in fact, a ‘bad batch’ is extremely rare(!)
- By avoiding these common mistakes, the job becomes easy and you should then enjoy a successful long lasting floor coating for many years to come.
Further Technical Help
Thank you for your interest and we hope you have found the above information both interesting and helpful. However, should you still have been unsure as to the best solution for your needs, please don’t hesitate to ring our technical helpline now on 01234 846400 . We have a fully qualified team ready to give practical advice and help assist you as much as possible.
