 Account
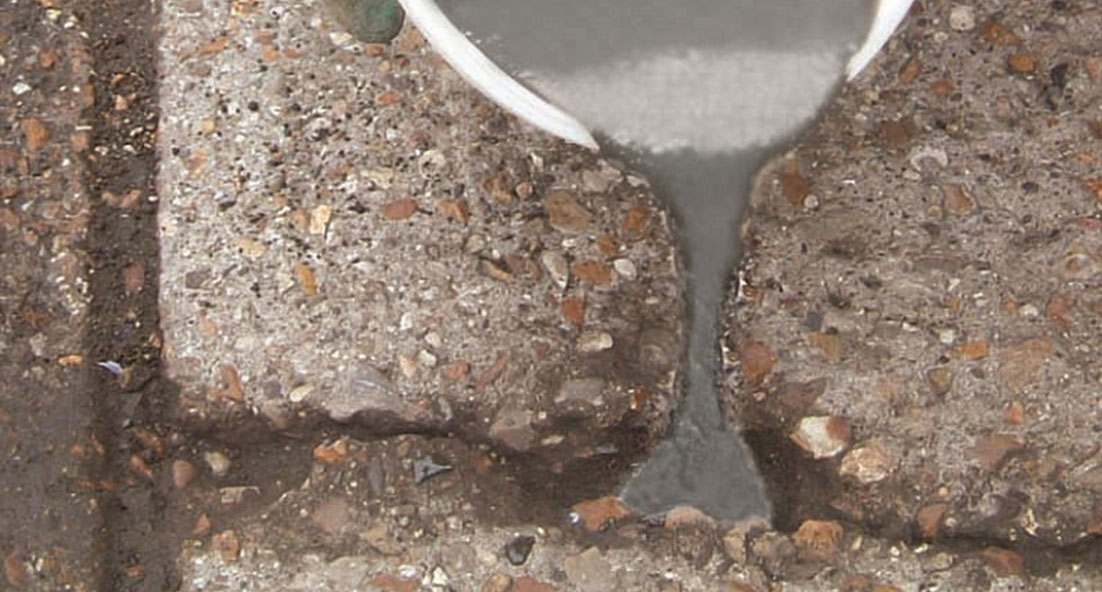
If you are one of the thousands of people/companies suffering from failing expansion joints then I am sure you will find the following notes useful:
WHY DO I NEED EXPANSION JOINTS?
First of all, I would like to confirm exactly why the joints are there in the first place because one major problem is that people are filling expansion joints with hard /solid materials and this is fundamentally wrong!
Very simply, expansion joints are there to allow expansion and contraction and should you prevent the slab from moving, you may well very quickly find the slab cracking with ‘spidery’ irregular cracking across the slab which will only get worse – all due to the wrong material in the expansion joint.
Secondly, joints often fail in the first place because the builder uses a ‘cheap’ flexible silicone (or similar) which certainly allows for expansion and contraction BUT, the product is soft. You may well say, ‘well what’s the problem with that?”. Very simply, if you traverse a soft joint with a pallet truck or forklift, this ‘soft’ joint squashes – the weight of the vehicle is transferred to the shoulders of the concrete and very simply the 90° edge doesn’t like it and starts to break up!! And as we all know – virtually every industrial building in the country suffers from this problem!
By the time you read this guide, you are more than likely in one of two predicaments – 1) expansion joint filled with hard material and experiencing cracking in both the joint and within the slab or 2) the edges are breaking up and the existing joint has ‘fallen’ out…! So what we will do is to consider both of them separately and by the end of this – whatever your predicament – you will have an easy, fast, permanent solution!
SOFT JOINTS / EMPTY JOINTS
If you are quick enough and the edges of the concrete are still relatively intact, excellent. Simply clean out the joint, making sure there is no oil or grease and that the joint is dry. If the resultant hole is deep, here is an excellent tip: you can either use kiln-dried sand available from any builders merchant to fill the joint up to 10-20mm down from the surface. The only thing I would say about this method is that sand/dust will be on the sides of the joint and subsequently stop the epoxy resin from sticking to the concrete so simply but carefully brush along the shoulders of the joint to clean them off.
Alternatively, you can purchase our Foam Backing Rod which is available in 15mm, 20mm and 30mm diameter ‘rods’. This is quick and clean and simply involves you ‘squashing’ the rod into the joint and again, pushing it down to about 10 – 20mm below the surface. You can then pour any one of our professional expansion joint products to fill the joint.
For the different choices of product, please see the options available at the end of this guide along with a short explanation of their individual benefits.

DAMAGED EDGES
If the shoulders of the joints are not too bad, any one of the twin pack Jointex products will fill the hole completely including the damaged edges. However, I would like to make it clear that whilst many of our customers do fill this way, the Jointex products are not designed to ‘feather-edge’. What is meant by that is that every hole goes from ‘whatever depth’ to nothing – and it is the thin edges of every repair that ultimately is weak and starts to fail.
So let’s now assume the edges are of a nature whereby it would be best to repair first with a product that is much stronger and harder and is genuinely designed for repairing rather than expansion and contraction.
This product will be Polycote Cretex EP – a fantastic, easy and quick product to use. It requires no priming, no digging out and will feather edge with no problem whatsoever. Furthermore, it will take just about any amount of heavy traffic you might care to give it from forklift trucks to tanks. Yes, even tank museums have used out products with 100% success! Either fill and shape the sides which is not always easy – depending upon the depth of the repair. Alternatively, a length of timber can be used as a shutter. The one problem with this is to time it right and remove the ‘shutter’ before it is stuck good and proper!! Can be done and easily too, but just done leave it too late…!
Now for the PROFESSIONAL way…
…and this will now relate to the joints that you may have that have been filled with epoxy mortars and are causing issues but not allowing expansion and contraction…
BADLY DAMAGED EDGES / SOLIDLY FILLED JOINTS
Just keeping to the filling and repairing for the moment. The best and most professional way to repair and fill the joint is as follows…
Repair with either Polycote Cretex EP (for smaller individual repairs) or Cretex EP Mortar – which is mixed in 30kg units. Whichever product is used, fill the expansion joint completely (obviously you will have cleaned the joint first and will have removed all loose material) and allow the epoxy to cure – say 18 – 24 hours. Then run a diamond grinder in a straight line down the centre of the original joint. Tip: to keep this straight the use of a chalk line will achieve a nice straight line easily. Once you have sawn through, fill the joint with one of the Polycote Jointex options.
NOW, you will have an expansion joint where the shoulders are solid and supremely strong and with a joint that will not only correctly allow for expansion and contraction but will not ‘squash’ and will therefore continue to protect and support the edges of the joint.
You don’t need expensive labour. You don’t need any ‘fancy tools’ other than an angle grinder and a trowel. The products are non-toxic and non-taint meaning no small and suitable in food and other sensitive areas. Not only are they extremely chemical and abrasion resistant, but they are impact resistant. They cure quickly certainly within 24 hours and will take virtually any amount of traffic. You too can join the thousands of happy customers – worldwide!

THE OPTIONS AVAILABLE:
Jointex EP. This product is a twin pack epoxy and the flagship of our jointing range, both for strength and resistance.
Jointex PU. This is a twin-pack polyurethane jointing compound that offers further flexibility and a greater chemical resistance
Jointex XFH. A unique formulation that not only has excellent flexibility and strength but will cure and be ready for use by ANY traffic in less than 2 hours
Jointex CSG. Another extremely unique resin that can be applied in cold stores down to as low as -30°C and can still be used by any forklifts or pallet truck in less than 2 hours!
Jointex SP. Our answer to those of you who do not want to mix a resin but to simply apply a product direct from a tube. Easy, simple and strong.
FURTHER TECHNICAL HELP REQUIRED?
Thank you for your interest and we hope you have found the above information both interesting and helpful. However, should you still have be unsure as to the best solution for your needs, please don’t hesitate to ring our technical helpline now on 01234 846400. We have a fully qualified team ready to give practical advice and help assist you as much as possible.
